The PanDA client package
contains a number of tools you can use to submit and manage analysis
jobs on PanDA.
While pathena is used to submit Athena user jobs to PanDA, more general
jobs (e.g. ROOT and Python scripts) can be submitted to the grid by using
prun.
Finally, pbook is a python-based bookkeeping tool for all PanDA analysis jobs.
Detailed information about each of the tools can be found in the above page.
Setup
If you are working on lxplus, the client is already installed, so to use it you only need to do:
setupATLAS
lsetup panda
Here we have set up the cvmfs software environment and asked to set up the Panda Clients.
To keep your grid work consolidated, create a new directory within tutorial
called GridTutorial:
cd tutorial
mkdir GridTutorial
cd GridTutorial
Run a ‘Hello World’ job with prun
From your GridTutorial directory, create a new directory for a simple
prun test and navigate into the new directory:
mkdir prunTest
cd prunTest
This is important because
prunsends (almost) all files in, and below, your current directory to the grid. Any unnecessary files in your current directory will also be sent to the grid and will slow down the job launch.
Now, create a python script called HelloWorld.py (using your favorite editor),
that contains the following lines:
#!/usr/bin/env python3
print("Hello world!")
Make the python script executable with:
chmod u+x HelloWorld.py
Before launching it to the grid, it is important to run it locally. You should always do this to avoid wasting grid resources on jobs that crash locally.
./HelloWorld.py
Now we can submit the prun command to run this script on the grid:
prun --outDS user.$USER.pruntest --exec HelloWorld.py
Here $USER is your grid nickname/grid name (which is the same
as your lxplus username).
If you don’t already have one,
prunwill ask you for your password and create a “grid proxy”, which is used for authentication. Recall that you can also do this yourself beforehand:voms-proxy-init -voms atlas:/atlas
This will queue two jobs, one build job that recreates your job environment
and one corresponding to the actual Hello World job. The build job will
execute first, and once it has finished the Hello World job will be executed.
When the job has finished, we will try to find the “Hello world!” message in
the output!
In PanDA, a task is a collection of jobs.
Monitor the job
If the job is successfully launched, you will see a confirmation printed
to the screen along with a jediTaskID number that you will need in the
next step.
To monitor the progress and check the log file output of a job, we can use
the big panda monitor https://bigpanda.cern.ch. Scroll down to the field
for Task ID and enter the number we noted above, and click on search.
This will send you to a page associated with this task, and shows that there are two jobs (in some stage of running). Have a look on this page to see the various pieces of information provided.
Now we will try to look at the output. We will need both jobs to have finished. If the jobs do not seem to have started running after a few minutes, it is suggested to carry on with the tutorial, and to check back frequently on the status of the jobs.
In the top right corner of the PanDA page, you will see a time and a link to “Refresh”. PanDA caches the status of the jobs to reduce the load on the jobs database. To force it to refresh the status, click on “Refresh” and you will see the time change.
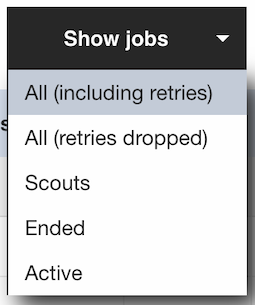
From the task page, click on the Show jobs drop-down menu:

This will give you several options of associated jobs to view. Click on
All (including retries) to see a list of all jobs associated with the
task:

If you want to get to the list of jobs directly, you can use the URL
https://bigpanda.cern.ch/jobs/?jeditaskid=4203786 and modify the
the jeditaskid to the value corresponding to yours.
From here, you can click on the PanDA ID number corresponding to a
job. This will take you to a new page with details about that job. From
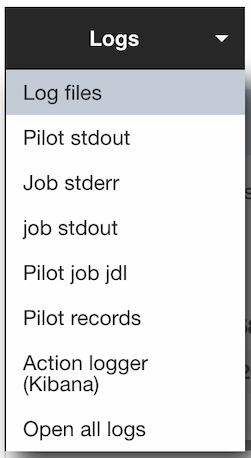
this page, click on the Logs drop-down menu:

Now, click on Log Files to get a list of the log files associated
with the job:

The log containing the Hello World output is called payload.stdout. Click
on it to open it and try to find the “Hello world!” message.
This forms the basis of simple debugging of jobs that fail on the Grid. As you will have tested the job locally first, if there is a problem, it may be a transient grid error, but it is useful to know how to search for problems in the output files. Note, it is also possible to download the log files as a dataset using dq2/Rucio.
Skip build stage
Now, because we did not need to compile any code to run this job - it’s just a simple python script - we do not actually need the build stage of the job.
To launch a prun job, without the build stage, type the following command:
prun --noBuild --outDS user.<nickname>.pruntest --exec HelloWorld.py
Now, only the script will be run. Usually though, you will probably want to compile some code first. You can read more about the PanDA tools.
⭐️ Bonus Exercise
So far, only the basics of the BigPanDA monitoring are described. As an optional exercise, see if you can find the link that shows all of your jobs. This is a good page to bookmark, to come back to in future. This is particularly handy in case you submit many tasks and want to watch all of them, or if you need to check on a colleague’s jobs.
⭐️ Bonus Exercise 2
Under normal circumstances, you should not send any jobs to the Grid that do not work. For this one case, to see what happens, try modifying your HelloWorld program to crash. For example, you can change it to:
#!/usr/bin/env python3
print("Hello world!")
Hello World!
If you re-submit this to the grid using the same command as before, you will see
extra output from prun:
INFO : reactivation accepted. jediTaskID=42140149 (currently in done state) will be re-executed with old and/or new input
PanDA keeps track of what has already been run, and knows if you’ve submitted that job before. Importantly, PanDA takes shortcuts — it won’t set up the job again, and will use the script that you already uploaded to the grid, so you won’t see a crash! If we want to run the new script, we need to give the new job a new name:
prun --outDS user.$USER.pruntest2 --exec HelloWorld.py
This time you’ll see the job fail. Take a look at the message that PanDA reports.
Unfortunately, it doesn’t know how to parse errors in log files very well, so you
are very likely to see: “Unspecified error, consult log file”. Take a look at the
log file and see if you can find the error. Notice that the error here is still
reported in payload.stdout, not in payload.stderr as you might have expected.
It can take some practice to learn how to efficiently debug problems on the grid,
but it’s worth investing some time in that practice!
On the task monitoring page, as well as in the email you get from PanDA when your task is complete, you will notice it reports a carbon footprint for your job. You can read more about that here. This particular failure probably used as much carbon as about 30 seconds of breathing, so don’t worry too much about it. Still, this is a good reason to test your jobs carefully, learn how to optimize your code, and generally avoid wasting CPU on the grid!
Sometimes it can be hard to understand why a grid job fails. It takes practice! Spend a few minutes trying to understand why the job failed, and if you can’t figure it out please ask for help. Sometimes you run into a bad site, or an unusual feature that the experts can quickly identify.
⭐️ Bonus Exercise 3
Fairly frequently, you will see a crash on the Grid and think “What happened?” PanDA has an extremely convenient feature that will help you find out. From the job page that we looked at earlier, underneath the job definiton, click on “Go to”, and then “Script to re-create job for offline debugging”. This will show you exactly what PanDA ran, and you can re-run it locally to see if you find the same crash. For example:
#retrieve inputs

rucio download panda:panda.1120232409.633184.lib._42140149.40662223804.lib.tgz --no-subdir

#get trf
wget http://pandaserver.cern.ch:25085/trf/user/runGen-00-00-02
chmod +x runGen-00-00-02

#transform commands

source ${ATLAS_LOCAL_ROOT_BASE}/user/atlasLocalSetup.sh -c el9
asetup --platform=x86_64-el9-gcc13-opt NULL
./runGen-00-00-02 -j "" --sourceURL https://aipanda117.cern.ch -r . -l panda.1120232409.633184.lib._42140149.40662223804.lib.tgz -p "HelloWorld.py" --useCMake --cmtConfig x86_64-el9-gcc13-opt
You can run that almost directly in a shell and reproduce what was run on the grid, though you may need some setup commands (e.g. you will need to setup rucio yourself for that to run).
You’ll notice that the script looks a lot more complicated
than just the HelloWorld.py command you submitted to the grid. There are quite
a few wrappers and other tricks that the grid software uses for user jobs to
make things run smoothly. For production jobs (e.g. event generation or
simulation), you’ll often find that the script looks very much like what you
would have run yourself.